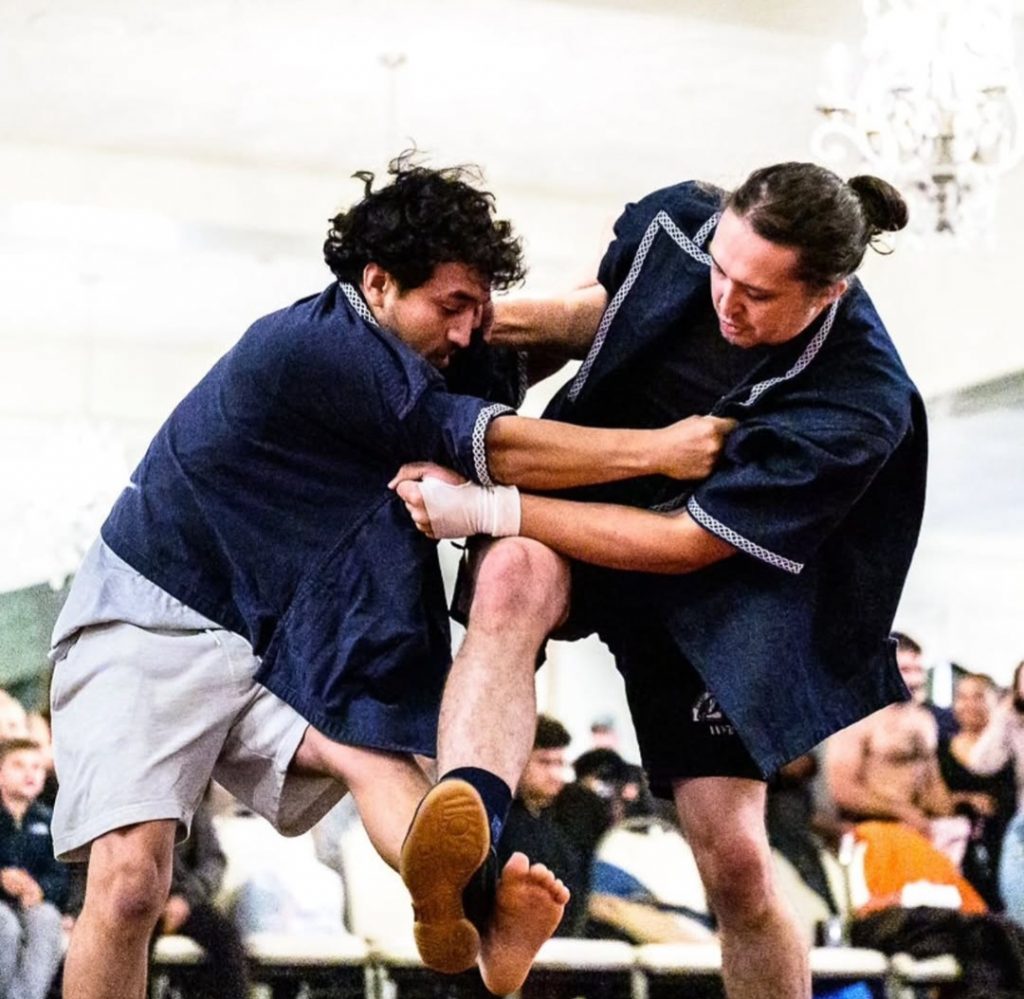
The Writings of WW Stevens

Category: Headlocks

Martial Arts, Health, and Training

Losing the Long Pole and Cutting the Swords

In Wing Chun’s current zeitgeist a question or two surround the two weapons. Do we keep them around? How do we train them in the modern day?

Wing Chun has always been primarily an empty hand system, but its two weapons are also deeply entrenched in our art and are symbols of it to this day. Yet, due to the popularity of combat sports, and dangers of weapons fighting, some Wing Chun schools have started to move solely towards kickboxing.

Many schools do not place equitable emphasis on the weapons vs the fist. When I say “equitable emphasis,” I don’t mean you have to train weapons as much as the fists. But maybe in equal measure to the forms. Typically, Wing Chun has three hand forms, the wooden dummy, and two weapons forms. So theoretically, you should be training the Lok Dim Boon Gwan or BakJom Dao at least one sixth of the time. Yet many Wing Chun schools do not even come close to this.

As someone who comes from a school that actively trains the weapons, I find this very apparent. I travel a bit every year and find other schools to train with while I’m out there. Some schools practiced the weapons, others only practiced the blades, and some only practiced the empty hand techniques. So why do we have these differences in training and curriculum? One answer that I have heard is simply space.

A lot of schools don’t have a ton of room and since Wing Chun hand fighting takes up even less space, a lot of sifus will go with a smaller space to save money on rent. And if you’re in a big city with little space (like Hong Kong or New York), you may have little choice about where you can train. Wong Hong Chung even discusses this issue of space in his interview with Wing Chun Origins.

Other schools have a different approach to the weapons, which is to see the weapons as beautiful relics. Important to the development of Wing Chun in its past, but not necessarily needed for its future. Yet, these two weapons in particular are so important because they are truly Southern Chinese weapons. The long pole and the butterfly swords found in Wing Chun are common in other Southern Chinese systems like Hung Ga, Choy Lay Fut, and Lung Ying. And while the fundamentals are the same, each style has its own method of these weapons, including power generation, defensive tactics, and just the forms themselves.

One way around the space issue is to train shorter versions of the pole. For example, while I am certified under Michael Valenti, I have also trained with Larry Rice during my time in Asheville, NC. With Michael, we use the traditional length of staff and practice with care. Only a few people are ever training the weapons at a time and if we need to, we’ll go outside to accommodate the space. When I was at Larry’s, we trained using six foot poles probably 80% of the time and would practice with traditional weapons when there was room. While I prefer the traditional length, I think the six foot pole training was also valuable.

Practicing the form and techniques with a variety of lengths and weights taught me to understand the details of this weapon more thoroughly and how to apply the concepts more broadly. And this helps me apply the weapon’s lessons in a broader context, as we are taught to do. I use lessons from both weapons in my grappling and kickboxing. They teach a surprising amount about body mechanics and distance management, if you are willing to train them.

But what options do we really have as practitioners and teachers?

Option 1: Train the Weapons as They Are

The first option is the most apparent: simply keep training Wing Chun in its entirety. Wing Chun is an historical martial art. This does not mean it cannot be used for sport or self defense. It can be. But it is a solidified system that is not prone to changing that much. On top of this, the traditional structure of Ip Man Wing Chun has only certain lessons in certain sections of the curriculum. For example, the Lok Dim Boon Gwan has the only major examples of level changing. It would be a much weaker art without this lesson.

If we want to truly preserve the lessons of Wing Chun then we should be willing to perform all aspects of the art, even the ones that are difficult. And it may not be the most lucrative, but if we were worried about that, we would just teach Tae Kwon Do in a strip mall.

There are many ways to do this, like the shorter staves for practicing in close spaces and padded foam weapons for sparring.

Option 2: Turn the Weapons Forms into Hand Forms

One way to maintain the lessons of the weapons is to practice the weapons forms as hand forms. I personally do this already, even though I still practice the weapons as they are. Since the hands and weapons inform each other, it’s not that far of a stretch. While this would maintain the major lessons of the forms, it would turn Wing Chun solely into a kickboxing art.

Even though beimo is historically the primary focus of Wing Chun, we would be losing certain aspects of the art if we move forward in this manner. It would result in less well rounded practitioners. Weapons training improves you as a martial artist in ways you often don’t realize until after the fact.

If you’re worried about self defense, you have to know how to fight in Stand, Clinch, Ground, and Weapons. Wing Chun is only missing ground fighting. If we cut the weapons, we’re left with only the first two. Wing Chun’s weapons are not as dynamic as Kali’s, or as broad in scope as Kobudo’s, but few things beat a big ol’ stick.

Another issue with losing the weapons is the loss of conditioning. While basic hand and leg conditioning would still be apparent, the weight training, precision training, and core training of the Lok Dim Boon Gwan would have to be supplemented with other drills.

And if one decided to be rid of the blades as well, certain wrist and forearm conditioning drills would also be lost. You can’t go around fighting with weak hands. Wing Chun is not that internal.

Option 3: Lose the Weapons but Keep Their Drills

This one is even more austere than option two. If we plan to lose the weapons forms, we could keep the drills of those forms to maintain some of these lessons. For example, the arrow punching drills from the Lok Dim Boon Gwan are essential to Wing Chun’s explosiveness. The pole also is the only area to teach the sei ping ma and cat stances. Using these footworks makes your Wing Chun more fluid and quick.

But depending on your school of Wing Chun, you may not have that many drills for each weapon. Many schools of Wing Chun mainly focus on the forms for the majority of their training and may only have two or three drills for each weapon. The Bak Jom Dao form is so different in order from school to school, in part because it is just a series of drills.

So you may have to add some of these lessons into other forms. This leaves you with a system that begins to shift outside of the tradition. But this isn’t necessarily bad or wrong.

Each generation has changed Wing Chun to fit its needs. Leung Jan originally taught Wing Chun with a strict curriculum, but later boiled it all down to techniques with the Kulo style of Wing Chun. Ip Man taught the forms in different orders at different points of his teaching career.

Option 4: Teach Different Weapons

This one is a “Thanks, I hate it,” option for me. I’m discussing it here because this does happen and it can go well or poorly. I have seen Wing Chun from a school where the instructor was not required by his sifu to know the weapons to open his own school. He taught Wing Chun, but taught Eskrima solo baston as a weapon during his Wing Chun class, and frankly not very well. And I love FMA, I train it constantly, but it’s not Wing Chun. Nor is it wrong to train Wing Chun and another art. That’s often good. But there was a disingenuousness to this instructor’s decision.

To me, this plug and play mixing, it doesn’t show respect to the art as a whole. He couldn’t be fucked to learn the traditional weapons, so he throws some basic stick fighting into his Wing Chun class. I’m not saying you can’t cross-train, obviously you should do that. But there is the issue of misrepresenting Wing Chun to the next generation. There is the issue of not having all the tools and concepts to discuss Wing Chun and even how it relates to an art like Eskrima. And not fully understanding Eskrima and trying to add it to Wing Chun.

Wing Chun is not the only art I train. So I think it is fair for me to say that it is not a large curriculum, especially not for a Chinese art. So it seems impatient and immature to add a weapon to a system you have not completed.

And I treat that situation differently than instructors who have completed the curriculum and then added weapons or other techniques. I have been lucky enough to drop in during my travels on schools where the sifu has added weapons. One simply taught the blade techniques with machetes. The other kept the traditional weapons and forms, but also added cane fighting. They know what Wing Chun is and they have made a conscious decision to adapt it. There was intention about what they were adding and how it affects their student’s learning.

They are not incidentally severing their students from resources, the traditional weapons are still there. Or if they take out the traditional weapons, they have a good reason for it. They’ve done the work and they understand the choice they are making, and I respect that. These teachers took the fourth option, but applied Wing Chun to these weapons. In my limited experience with these teachers, many of the lessons are still there. And it is in a sense, an extension of what we already do with the weapons: view them not only as the weapon itself, but also as a prototypical signifier of any weapon you may pick up. So, while I may not personally enjoy it as Wing Chun, I have to respect it as an option.


So what do we do? Where do we go with this? Personally, I say go with Option 1. If you need, add what you feel is necessary, but don’t cut away the weapons that our kung fu ancestors saw as essential.

As the decades pass, arts will change and what we do now is not what Wing Chun will be in the next 50 years. That’s okay. That’s not a bad thing. But we do have to ask ourselves what is right to change and what must stay. When the art changes, does it continue the fighting spirit of Wing Chun or mute it for the next generation?

Terminology is Important, But Not That Important

One of the easiest arguments to find yourself having in mixed martial arts circles is not about ring control, or the right way to handle the calf kick, it’s about what you call that one move. And it can be a fun argument to have, but sometimes people take it a little too seriously and you’re left wondering if everything is okay at home. You may think, “It’s just a word, the move is the same.” Or you could be thinking, “You need to say it right, you need to understand what you are communicating.” And yeah, two things can be true. So what is up with martial terminology?

Terminology Gives Us Common Language to Recognize Complexities

By having more standardized words, we can differentiate between similar movements, tools, and concepts. At a beginner level, this is not too important, but as one moves into intermediacy it becomes more necessary. Details make the difference between a jab that connects and a jab that really hurts. So if you have a word to differentiate the two, you are ahead of someone who just understands the jab as one or the other. This extends to all aspects of martial arts. Footwork requires finesse, fight strategies need detail, even workouts need differentiation. 

Terminology Allows Us to Communicate How We See a Topic

By exploring terminology, we can understand how different arts and teachers treat certain tools. For instance, we have the armbar. In English speaking arts like Catch, we generally call it an armbar, showing that the lock attacks the arm by straightening or “barring” it. It is a simple and effective way to explain the concept. The details will change from technician to technician, so don’t get bogged down when you first learn it. The same is true in BJJ, even in Brazilian it translates to armbar or armlock. In arts like Judo, it is termed juji-gatame, or ude-hishigi-juji-gatame.

We can learn a lot just from this single term. “Juji” is the same kanji for “jujika” or “cross”, which can denote the right angle one takes to the opponent’s body, but also the manner in which the arm is outstretched. The next part is even more interesting, “gatame” is used for pins and certain locks. Most joint locks in Judo use the term “garame”, but certain joint locks have the term “gatame” instead. So why is that? Well the principle is that locks like armbars (juji-gatame) and head and arm choke (kata-gatame) can be used to effectively pin an opponent as well as submit them. On the flip side, “garame” means to entangle or twist. On top of all of this, “ude-hishigi” (arm break) denotes that this movement is a type of arm submission, that it causes pain. Look at how much information and context is contained in essentially four words. This is just one movement and we can see what the priority is in each art.

Terminology Can Cause Separation Due to Interpretation or Similarity

Unfortunately, sometimes we get so focused on terminologies that we forget to actually focus on the techniques. Terminology can cause conflict among groups that at the end of the day, doesn’t even matter. You may call it a double-wristlock, I call it a figure-4, and someone else calls it a kimura. At the end of the day, we’re all ripping some guy’s arm out of its socket. But how much time is spent arguing over these words? What’s more important is discussing details of the movement or technique. You can call it whatever you want, but if you can’t do it, it doesn’t matter. As helpful as terminology is, it is just a tool for communication. It is not the Gospel truth.

Terminology Can be Used to Create In-Groups and Out-Groups

This phenomenon is particularly frustrating. I have seen it most in kung fu circles. To give an example, in Wing Chun we have a drill called chi sau. It’s a sticking hands game used to teach the trapping range. At the beginning stages you are just trying to learn how to feel your opponent and stick to them to trap or strike. As you advance you start including footwork, head movement and Wing Chun’s full range of tools. Advanced chi sau is not sparring or fighting, but it is closer than beginner chi sau. Where I train we just call that advanced chi sau or sheung (double) chi sao, but in Cantonese it is often called “gor sau.” But we’re already inundating the students with all sorts of terms from a language they don’t know. We don’t need to overcomplicate something that can be said in English.

Some other Wing Chun schools don’t like that and have implied that my Wing Chun is bastardized or inauthentic. And it’s not that I don’t know words like “gor sau,” just that I don’t use them in general parlance. But I can actually fight with my Wing Chun, so they can keep gor sau.

Terminology is a Tool

When we focus on the terminology, we can learn a lot about the art or curriculum we are studying. As a self-professed word nerd, I really recommend that people dig into the terminology of their arts. You can learn a lot about the art, the history of the art (which most people forget), and it can even improve your form.  But I also have to caution against getting focused on what each person calls it. Unless you are the developer of a school’s curriculum, it’s not your job. Don’t argue whether it’s a “head and arm choke” or “arm triangle”. It’s both. It’s neither. No one cares, go train.

Chi Sao is Grappling for Striking; What Can it Teach Us?

When people research Wing Chun online, the first thing they probably see is two practitioners playing the game of chi sao. It might seem like an overcomplicated game of patty-cake, but what it is really simulating is the moment of clashing. Chi sao is the term used for a large series of sensitivity drills and a game that comes from the same starting position. By staying in this moment, we develop sensitivity in our arms and legs so that we can navigate past our opponent’s limbs to strike. We’re learning to feel what the eye fails to see.

In all striking arts, we have to deal with reaching our opponent and not getting hit. Wing Chun seeks to do so with the art of trapping: seizing an opponent’s limb to capitalize on an opening.

Chi sao is all about navigating and seizing limbs, creating openings and going for the kill. Chi sao, like all trapping, is grappling. It is generally grappling with the goal of striking.Wing Chun as a whole has a spectrum of lots of grappling to no grappling. Some schools grapple, some only seek to punch. Chi sao obviously has its uses in striking contexts, but what can it bring us in the broader context of fighting? I put it to you that chi sao is an excellent addition to any grappler’s hand fighting. 

Below are some techniques that can be employed in chi sao that benefit hand fighting. For the purposes of this article, I am using the terminology of Wing Chun. This is not to complicate, but rather to give grapplers an avenue into understanding a bit of gung fu, as well as give some practitioners of Wing Chun a more expanded view of their toolbox.

Sheung Lop Sau

(Double Pulling Hand)

Wing Chun’s method of arm drag might feel a little bit stiff compared to Folkstyle or BJJ, but that’s because Wing Chun focuses on losing as little balance or opportunity as possible. Nonetheless, I highly recommend taking a look, as it may improve your arm drag opportunities.

A standard entry for the dai lop sao comes from the nucleus of chi sao. When our opponent pushes our left limb, we sneak our right hand underneath, like a snake. Once this happens, we snatch their right arm with our right hand and add our left hand to the effort.

A more dynamic set-up for this can be drilled as a defense against a collar tie attempt. When your opponent reaches forward, shoot out your right hand like a spear to clash against it and bring your left hand to the tricep. With one hand to grip each section of the arm, turn and snatch that arm to the ground.

Huen Sao + Tok Sao and var. With Tan Sao + Jut Sao

(Circling Hand + Lifting Hand) (Dispersing Hand + Yanking Hand)

In Wing Chun, we have a tool called the huen sao (circling hand). This is a flick of the wrist that sends an outstretched hand flying. We often use it to take the inside line and hit. In this example for grappling, we will use the same concept.

We’ll take the huen sao to their lead hand and send it outward, as they look to recover space, we’ll shoot that hand under the armpit with a tok sao (lifting arm), thus giving us the underhook.

This basic concept can be improved by performing a defensive tan sao + jut sao with the other hand. A tan sao is a simple open hand wedging motion. Jut sao refers to pulling or yanking towards your core. Think of a tan sao like offering some candy to a friend, and the jut sao is you snatching it away. So while you navigate past their lead hand with your huen sao, you can shut down the back hand with the tan sao and even turn it into a wrist tie with the jut sao.

Pak Sao + Fuk Sao

(Slapping Hand + Bowing Hand)

This one comes in handy when defending against a wrist or elbow tie. For the sake of demonstration, let’s say your opponent reaches for your left hand with their right. This is where you apply a right pak sao (slapping hand) to the inside of their arm and shoot your left hand forward to latch a fuk sao (bowing/hooking hand) on their neck.

Sheung Jut Sao + Sheung Tok Sao

(Double Yanking Hand + Double Lifting Hand)

This is one is not reacting to your opponent, but rather just attacking an opening and moving into the clinch. Many grapplers keep their hands forward, but lower toward the chest/belly, in order to handle attacks to the head as well as shots to the legs. If you are facing an opponent who routinely keeps their hands low, you can capitalize by seizing their arms with two jut saos. Think about grabbing at the fat of the thumb, where it coincides with the palm. After this, shoot your hands underneath their armpits to get double underhooks.

Why We Need Specialists

First let’s define a specialist. A specialist is someone who focuses on one area of study or one art. So someone who only boxes is a specialist, just like someone who only grapples. But being a specialist can also mean someone who is focused on self defense, someone into ancient weapons, or someone who only focuses on sport fighting. A nak muay and a point fighter are both kickboxing specialists, but on different ends of the scale. So why do we need these guys?

Some People Don’t Want to Mix Their Martial Arts

We’ll start with an easy one. Some people just want to learn one aspect of fighting. It may be a preference for sport, such as boxing. Or they might have a concern for defense, but wish to handle it more gently, like Jiu-Jitsu. It could also be from a cultural connection, like folk wrestling styles. Sumo is not only a badass sport, it’s a point of national pride and cultural heritage for many Japanese people. While I for one love to learn all the nooks and crannies of fighting, I know many people who just want to box, wrestle, or do kung fu. And that’s okay. In fact, it’s great. Because this gives them something that I don’t have, which leads me to my next point.

Specialists Have a Greater Understanding of their Field than a Jack-of-all-Trades

A kickboxer will outclass a mixed martial artist on striking. A wrestler will do the same on the ground. They have more reps in that area and they have studied it more intensely, understanding concept and theory on a deeper level. This is why MMA fighters have striking, grappling, and conditioning coaches. They depend on people who focus on portions of the game to give them an edge and ensure they are performing to the best of their abilities. These understandings can go even deeper as well.

A grappler with decades of practicing Greco will have a better understanding of clinch grappling than a BJJ or Freestyle practitioner. So these specialists can look at a fighter and help them develop tools that fit their style. Now the flip side of specialists is also true. Generalists show the weaknesses and strengths of particular strategies. They help specialists understand the nature of their techniques more deeply, even if the generalist may not realize it.

Specialists Maintain Knowledge for Future Generations

This goes back to my point of specialists having a greater understanding of their field. Specialists can keep their arts or fields of study a priority. They don’t forget techniques and concepts just because they’ve gone out of vogue. We’ve all seen it happen, where someone shows off a move that they developed only for others to say, “Yeah we’ve been doing that for like a hundred years.” Human knowledge is not a constant pile that we all access equally. It is a flowing amorphous collection of understandings. Languages can be lost; so can artistic methods and even combative techniques.

This is probably my favorite aspect about specialists. As someone who spent much of their childhood in libraries, I love specialists. They’re like human textbooks. Consider a teacher like Roy Wood. He’s one of the foremost authorities on Catch as Catch Can wrestling in the world and he just wants to share this style and preserve what’s been given to him. Do his students have to only study Catch? No. Is he going to show them everything Catch has to offer? Absolutely. To be a specialist is to preserve knowledge that even you may not realize will be so helpful or revolutionary to someone.

What Does This Mean for You?

It means you get to decide what you want to learn. If you just want to study one art or area of combat, you can do that. If you want to study everything you can, then you can do that. But we have to recognize that there are tradeoffs to each method. For example, as a generalist I will never be as good at boxing or grappling as my specialist contemporaries, but in an MMA or street context, I have the option to take them where they aren’t comfortable. Would I win? I don’t know. But I’d certainly be harder to beat. In their disciplines, I’ll almost assuredly lose and my understanding of technique may never become as refined as theirs. But that’s okay.

We still learn from each other and we each have our roles in our martial communities. What we shouldn’t do is give in to tribalism and naysaying. What’s good will prove itself and what isn’t will fall by the wayside. Don’t worry, just have fun and train hard. And if you find a detail or intricacy that boosts your fight game, be sure to thank a specialist.

Attacking the Defense: Muay Thai

Muay Thai is a popular sport based in the ancient hand to hand arts of Thailand. Oftentimes, Muay Thai is called Thai Boxing or Thai Kickboxing and that is essentially what it is: the indigenous striking arts of Thailand boiled down to their essentials with a few tools banned for sportsmanship. Muay Thai has had its evolutions over the decades as it spread across the globe, but the overall structure remains the same. So how does it stack up in terms of defense?

Let’s look at the guards of Muay Thai first. Muay Thai has a number of different guarding methods. These are more dependent on the fighter than the art, just like Western boxing. You’ve got long guards, dracula guards, shells, high guards, but it all boils down to keeping your shoulders high, chin low, and hands in front of your face. 

The long guard and the high guard are the two essential shapes of Muay Thai guards, the others are variations of the two. The long guard is essentially keeping your head protected with one hand while the other is outstretched towards the opponent. This outstretched hand can be used to probe, parry, and stick to your opponent. It also lets you connect to an oncoming opponent and take up the clinch. The high guard in Muay Thai is the same as the high guard in Western boxing. Hands up near your brow, shoulders high and rolled forward. Where the long guard is more of a transitional shape, the high guard is where you spend a lot of your time.

Nak muay often hold their weight in a 70/30 distribution, though there are plenty of fighters who are closer to 50/50. The 70/30 split gives the lead leg a faster reaction and makes that front kick snap like a whip. But it does make angulated evasions a little tougher. It’s a very tall stance when compared to some boxers and karateka, but it’s also very balanced. The feet stay shoulder width apart and Muay Thai rarely uses footwork that brings it closer than that. You can absolutely off balance a nak muay, but it’s certainly harder than a Taekwondo practitioner.

Shield Block: This technique works just like in Western boxing. Bring up your glove to defend the head against strikes. Nak muay are quite skilled at pairing the shield with evasive footwork to reduce the impact. One problem I do see often is that they are so used to blocking with the glove on that they don’t effectively block when they are gloveless. Luckily this is an easy fix, you just have to put in reps with smaller gloves or bareknuckle.

Body Shield: The body shield is an effective technique that can protect the body without losing too much head protection. Essentially you are still protecting from attacks with the fleshy portion of the forearm, but this time you are tightly covering the ribs and protecting the core. The body shield is an essential tool for self defense and the great part is you don’t drop your hands too low. A lot of other body defenses open you up to headshots and this one reduces that likelihood.

Defensive Teep: The teep is a front kick in Muay Thai, with various forms. Some people treat it as just a front kick, others say that it is its own beast. There are many ways to hit the teep, but I would like to just give two examples of the teep’s use here. The first is a kick to the chest and the second is a kick to the leg. 

If you want to move a guy, don’t kick him in the belly. That bends him over. Kick his chest to knock his balance backwards. This type of teep makes space and gives you the chance to control where the fight goes. The kick to the leg is another thing.

When your opponent starts their kick you can shut it down quickly with a teep to the thigh. The teep works best at the thigh, because it requires less precision than stopping at the shin. This method hits the part of the leg that moves the least in its arc. You’ll also be hitting muscle when you kick the thigh; if you try at the shin, you’re kicking bone. Even if you’re successful that still hurts.

Leg Checks: A leg check can be a very useful defense against a kick, especially leg kicks. Leg checks work well because they aren’t stationary and can be done within larger motions. This means that leg checks can be linked into combinations or evasive footwork. A lot of arts block kicks very statically, but Muay Thai’s leg checks can make or break rhythm.

Super Shield: The Super Shield (aka Full Shield) is a block using the same side arm and leg meeting to block a kick. It’s essentially a body shield and leg check together. This is that full body block that most people associate with Muay Thai. Oftentimes it is blocking a kick coming at an unknown angle. Maybe it’s to the head, maybe the body, either way you don’t want to wait and find out. When executed with the proper pressure, this block can handle an incoming attack and set you up to counterstrike. The problem with the super shield is that you are left on one foot with a lot of your body weight crunched in a single area. If you don’t have proper pressure, you will be knocked back or even knocked down. This doesn’t mean the Super Shield is a bad block. It just has its drawbacks.

Destruction Blocks: Muay Thai makes excellent use of destruction blocks. The most common is using the knee to block the opponent’s shin. This is the defense made famous by Chris Weidman and Anderson Silva at UFC 168. While most destruction blocks won’t break the shin, it is a possibility. This defense is the most important destruction block to learn, but it isn’t the only one. You can also take your knee or foot to the front of the thigh, to bruise the quadriceps. It’s a lot harder to kick when those muscles are seizing.

Spearing Guard: A variant of the long guard, the spearing guard in Muay Thai is often used to handle wide hooks. Essentially you raise both arms high and spear them forward into your opponent’s attacking bicep and the respective collarbone. Though not as popular as other tools, it can still be useful as the spearing guard keeps your shoulders high to protect the head and the forcefulness of such a technique often handles the opponent’s momentum. Plus you’re right there ready to clinch and throw some knees.

Catching Kicks: Catching kicks can be done well, but I don’t always agree with Muay Thai’s method. It’s more of an overhook method, which increases the risk of taking the kick’s force on your ribs. Muay Thai does teach stepping in, past the point of greatest impact. That does reduce the chance of taking real damage, but I think plenty of us have seen a bad catch go wrong.

Blocking into Sweeps: Muay Thai makes excellent use of leg sweeps, either with a block or a catch. One shouldn’t seek to catch a leg, but when it shows up, you’ve got to act quick. Sweeping your opponent can be a useful reaction, either to control your opponent on the ground or to give yourself the time and space to escape. Muay Thai sweeps emphasize weight distribution and timing more than other kickboxing arts. Muay Thai’s sweeps are on par with Sanda’s. These two arts probably have the best sweeps in striking.

Scooping a Leg: I’m not a huge fan of this one. It certainly can be effective, but scooping a knee or kick puts your hand low and opens your head. It can be married with an attack from the other hand, but you have to be certain and well timed. The move is a bit high risk for my tastes, but I can’t deny it is a useful technique.

Scooting the Hips: Scooting your hips back from a kick can be done and done well. A benefit of this is staying in range to counter and gain momentum. Yet it requires a distinct understanding of your ranges and the length of your opponent’s legs. The other issue with scooting your hips is that it keeps you in that same striking range. Not two sentences ago I said that was a good thing, but sometimes things are good and bad. If you can strike them, they can strike you. When considering self defense, it’s all the way out or all the way in. 


So how does this look as an overall defensive plan? Pretty darn good actually. Muay Thai has a mastery of foundational techniques and fighters generally keep strong defenses. The art makes good use of offensive defense, in terms of destruction blocks and marrying defenses with striking. It’s very hard to find fault with Muay Thai, it’s quite an effective art. Does it have holes? Certainly. It’s a pure striking art, so it has no groundwork defense. It’s sport background often means that the nuances of fighting against a larger opponent get lost in the mix. I’d even dare to say that it over extends itself with its kicks and that is a defensive issue by itself. But for any gripes I have, I’ve got to give Muay Thai an A- for its defensive tools.

Attacking the Defense: Wing Chun

Wing Chun is an old system of kung fu from Southern China. Based in the arts of Shaolin snake and crane, Wing Chun evolved over generations on the Red Junk Opera boats and the rooftops of Hong Kong. Now it looks vaguely like kung fu boxing. It’s got kicks, chops, knees, and elbows, but most often it looks like a small man’s boxing. What makes it different from other arts is constant pressure and trapping skills. Its blocking system reflects that. Is that good, bad, or somewhere in between?

The structure of the Wing Chun resembles an old boxing guard, but more plaintive, with open hands. Even though the head is more open than I prefer, I must recognize it still holds the hands about as high as most fighters. The front hand sits above the collar bone pointing towards the opponent. The back hand hovers around the lead elbow, rarely lower than the chest. The benefit of this position is that it encourages your opponent to take wider shots. Your core is also protected and keeps your hands ready to cover the four gates. Wing Chun uses the four gates theory for attack and defense. Essentially, you have the left and right sides of your head, and the left and right sides of your torso. You can’t defend one without opening another. With both your hands starting in the center of your body, they can easily move to defend any gate.

The weight distribution is fairly contested in Wing Chun. Some schools put 70% of their weight on the back leg and 30% on the front, while others sit 50/50. Some schools even sit 90% of their weight on their back leg. I come from a 50/50 school and honestly I can’t see the advantages of a 90% back foot distribution. The 70/30 split has its advantages, the front leg is more ready to kick for offense or defense, much like the long guard of Muay Thai. Although it can lead one to not respond as well against someone barreling down your center.

Let’s discuss the primary deflections of Wing Chun. In Wing Chun, there are four primary blocks: tan sau, pak sau, gum sau, kan sau. These four are chosen as the primary blocks for two reasons. Firstly, the lead hand can defend while keeping the elbow on centerline. Secondly, these can deflect an attack and allow for a simultaneous counterattack with the back hand.

The secondary blocks are more focused on control of the opponent and sticking hands movement, even leading into clinch fighting. These blocks are bong sau, lop sau, huen sau, fuk sau, jum sau, and jut sau.

But what do all these movements with Cantonese names even do? Are they even effective? Let’s go back to those primary blocks.

Tan Sau: The tan sau (dispersing hand) is a deflection performed by placing your elbow in front of your solar plexus and holding the hand outwards, like awkwardly asking for money. This turns your forearm into a wedge against oncoming strikes, which are deflected or “dispersed” past your body. The tan sau is used in a variety of ways, but works best deflecting on the outside of the opponent’s arm. 

Pak Sau: The pak sau (slapping hand) is really just a parry. That’s all it is and that’s why it’s so effective. Parries are an essential defensive tool for striking. Pak saus are the most obvious example of blocking with a counterattack. Instead of parrying and then striking, Wing Chun uses the pak sau with a simultaneous strike, often called a pak da. 

Gum Sau: The gum sau (pinning hand) is used to deflect low attacks including fists, feet, and knees. It is also used, as the name suggests, to pin an opponent’s arm in trapping range.This is not a long term pin, but is instead pinning the arm for a second to allow you to attack. I’m not a fan of dropping your hands this low to block a kick, especially when Wing Chun has knee and elbow blocks. However, the gum sau as a trap is incredibly useful. When you use it this way, it opens a gate and collapses the opponent’s arm into their core. This affects their structure and often opens their chin even more.

Kan Sau: I hate it. The kan sau is a downward sweep of the arm, essentially a low block like karate’s gedan barai or gedan-uke.The kan sau is used to block low strikes, much like gum sau, but has no pinning capabilities. It’s not really a hard block, but that doesn’t mean it’s that effective. The only reason I, a Wing Chun practitioner, practice kan sau is because it’s a part of the system, I don’t use it when I spar or fight. The one thing I will give it, is that you don’t sacrifice structure to use the kan sau.

Bong Sau: The bong sau (winging hand) is a deflection that uses a corkscrewing motion to knock strikes off target. The rotational force of the bong sau is what makes it effective. It’s not a lifting motion, which is why it works. If it lifted, your shoulder would get beaten up and tired. Because it rotates it activates more muscles, including the pectoralis minor and the traps, and uses less energy overall. I have found a lot of use in the bong sau. I will note that unlike the primary blocks, it doesn’t really allow for a simultaneous attack and defense. Bong sau is a great set up for trapping and acts as an emergency block when your hand is low. 

Lop Sau: The lop sau (pulling hand) yanks an opponent’s limb to the outside of your body. This can be used to pull them into a punch, yank them out of your way, or even set up trips. Lop sau is quite useful, the problem being that it is often trained as a straight grab, but it holds more complexity than that. The lop sau works best if the elbow sinks into the ribs and the movement links the arm to the core to the hips and feet. Kinesthetic linking shows up a lot in Wing Chun; the lop sau is probably it’s most obvious example.

Huen Sau: The huen sau (circling hand) deflects an opponent’s punch away from centerline, thus causing them to respond behind the beat. Huen sau is great for counter attacks and also has an added use as a recovery tool. If you parry on the inside of a punch, make it a huen sau to get your opponent’s centerline back off of you.

Fuk Sau: Not really an initial defensive tool for most people, the fuk sau (hooking hand), is a great tool for sticking hands energy. Later, this tool can be developed for sensitivity and self defense fairly well. Fuk sau can be used to keep yourself safe in the pocket. However, that level of sensitivity takes a lot of time to develop. But uppercuts take a lot of time to get down as well.

Jum Sau: The jum sau (dropping/heavy hand) is a great tool. It’s really more about the elbow and forearm than the hand. The jum sau can be used as an elbow block to defend the ribs or as a trap. It’s also a great tool because after blocking, that hand is set up for a great counter shot to the head.

Jut Sau: The jut sau (jerking/shocking hand) is a quick jerking motion with your arms to pull an opponent’s limb down towards your body. This doesn’t mean the jut sau pulls it into your body, just more towards your centerline than away from it. This is most often seen as a defense against a grab or grapple, yanking the attacker’s arm in as you counter. It can also be a trap on a good guard, as consistent pressure is easier to fight than a shocking pressure.

Cut Blocks: This tool is an extension of the vertical punch, but with the obstructive energy of a tan sau. Essentially, you punch from the outside line as your opponent strikes. By keeping your punch on centerline, you cut across theirs, knocking it off course. This defends and attacks at the same time.

So what are some good examples of these tools in defense?

The most obvious example is the pak sau. Pak saus are parries, parries keep your head safe. Ask any boxer. Pak saus are essential, quick, tools. The best example of application is the pak da (slapping hit). As you deflect an opponent’s strike, you come over your pak with a strike of your own. The centerline punch of Wing Chun works really well in this. You can also parry and strike to the body, which works especially well for shorter fighters. These type of sector defenses are typical in Wing Chun. Students are taught not to simply defend. Attacks can be defense.

This pak da concept also works well against a tight guard. Instead of waiting for your opponent to open up, make them open up. When controlling the space, Wing Chun tends to be quite aggressive. This use of pak da exemplifies that.

The gum sau is often taught as a defense against a kick, using two hands to stop a kick near the thigh. I’m not a huge fan of this, but I mention it in the name of honesty. However, gum sau does have it’s uses. My favorite is defending against a tackle. As your opponent comes in, you gum sau to the side of their head and hinge one leg back. This angles you to your opponent and knocks their line of pressure off of you. It also lets you keep the fight standing.

The bong sau also plays a surprisingly useful role, bong sau leads into lop sau or tan sau quite easily and sets you up for kicks.

An important thing to remember is that in Wing Chun, these tools aren’t just prescribed for one thing. They are better seen as movements that can be applied as the user sees fit. For example, we have an horizontal elbow, pai jarn, that is often used as a destruction block as well as for bashing skulls. As students learn more, they are expected to test these out in new ways and deepen their understanding of the art.

Luckily we have maxims that help us weed out potentially dangerous interpretations. Let’s look at the bong sau again. We are consistently taught the bong sau as a transitory movement for defense and offense, but it shouldn’t be a stationary guard. On top of this, we are taught that elbows should return to protect the body. If bong sau were treated as a more stationary technique, the body becomes too exposed. So Wing Chun does have a method here, even though it may not look the way one is accustomed to.

The overall structure of Wing Chun’s defenses are pretty solid, the obsession with centerline protection is very useful. However, I don’t feel like it protects the head as much as it should. The tools that protect the head from circular shots aren’t as protective as I would hope. Tan sau can protect against incoming assaults, but it extends your hand too far for my liking. Biu jee works, but at a certain weight difference it stops mattering. I’m much more partial to the boxer’s shield. And when considering Wing Chun as a whole, culturally the kan sau is used more often than the jum sau for body shots. So Wing Chun is not perfect by any means. On a grading scale, I would give Wing Chun a B. In the right hands, it has excellent potential. But when taught to someone who can’t think for themselves, it’s more of a C.

Attacking the Defense: Krav Maga

Recently, while shooting the shit with some friends, the discussion turned to how we evaluate martial arts. I realized that we often look at scripted techniques or how they attack. These are important, but we also need to think: How does an art defend? So I’ve decided to ask this question about some of the more famous and infamous martial arts in a new series Attacking the Defense. In this article, we’ll be taking a look at an art that creates a polarizing response: Krav Maga.

Krav Maga is an Israeli system of fighting initially developed for the Israeli Defense Forces (IDF). It’s goal is to teach simple techniques dealing with hand to hand and weapons defense. The founder, Imi Lichtenfield, wanted the techniques to be simple so that students could quickly and efficiently learn to defend themselves. To some, Krav Maga is an effective and lethal art. To others, it is an art made up of gimmicks. I think it is somewhere in between.

One thing to understand about Krav Maga is that there are many different Krav Maga organizations and they focus on different goals first. Some have a higher emphasis on fitness, others perform more “stress tests,” thankfully some even spar. If that sounded rude, it was. I am salty that there are schools presenting themselves as self defense schools with students who never get to actually practice their training.

The quality control in Krav Maga is not great. In this way, American Krav Maga is like Tae Kwon Do’s edgy cousin with a knife collection. I can’t speak to other countries in terms of how it is trained. I can only speak from my experience and that of my colleagues. This alone doesn’t mean Krav Maga has a bad curriculum. It covers stand, clinch, ground, and weapons. However many of its answers to these issues are dodgy, in my opinion.

Before I tee off on Krav, let’s discuss some things it does well.

Stance: Krav Maga teaches a very useful initial stance, the neutral stance. With open hands facing outward, it can be used for de-escalation. It also helps protect the head and keeps the legs in a position to move in any manner.

Simultaneous Attack and Defense: Krav teaches the idea of attacking while you defend. Don’t wait for a chance after defending, do it then. I actually applaud that mentality. Counterattacks are really potent and help a defender stop their attacker’s momentum.

Inside Defense: It’s good, it’s always seemed a little stiff to me, but it still works. Basically a ridgid parry. 

Head Movement: Krav Maga teaches slipping as well as bobbing and weaving. They also teach it relatively early in the art, which I like. This gives the student more time to practice as they move through the art. My only complaint is that it’s not practiced enough from what I’ve seen.

Covering Defense Against a Hook Punch: This is a really useful tool, I honestly think this should be their major defense against a hook punch. Covering your head with your arm gives you extra cushion to protect your head and reduces that chance of a punch slipping through. With forward movement, it keeps you protected from the point of greatest impact.

Defense Against Low Kick with Shin: Hey look, it’s a shin check! Anyone who’s ever had to spar with nak muay knows these work and work well.

Defense Against Spinning Heel Kick: This one is pretty great. Kick the attacking tool before it can fully fire. It’s a little more high level, but a solid defensive concept.

Plucking Defense: This one is okay. Whipping a kick away isn’t a bad idea, but it feels high level for a curriculum with something like 4 takedowns.

Now let’s talk about what Krav Maga doesn’t do so well.

360 Defense: The 360 Defense method is one of those things that might seem effective at first. This is mostly used for circular strikes. The defendant blocks at outward angles, think high blocks and low blocks, but with added mid angle blocks as well. One problem with the 360 Defense is that this is taught to everyone regardless of size, shape, or health. Trying to perform an outward block against someone heavier than you can really hurt.

It might work for someone in the IDF, but not for a soccer mom. It also teaches you to block low punches with your arms instead of crunching with your elbows. It really leaves your head open. Students are taught to bend at their waist when performing these motions, which makes your defense of incoming attacks weaker. Students are also taught this for knife defense. You don’t block a haymaker and a knife the same way. It’s just not great. 

Outside Defense (Green Belt): The Outside Defense series is kind of a followup to the 360 Defense. The idea is to use high defenses to redirect strikes to the head, often straight punches. It feels clunky and unnecessary to me. These defenses open you up, keep you in line for further strikes, and depend on tricky timing. They may look simple, but they don’t seem that simple to me. One exception to this is the “Outside Defense Against a Right Punch” in which you use a corkscrew punch to simultaneously shield and counterattack. That one is a solid defense, I wouldn’t try the others.

Blocking High Kicks: My problem with the way Krav Maga defends against high kicks is where they defend. The high kick always seems to be blocked at the apex of its arc and power. That’s a lot to ask of someone. Instead, why not move in to block where there is less power? 

Blocking Kicks with a Low Block: This is first explored with the 360 Defense, but shows up elsewhere in Krav curriculums, depending on the organization. It’s just not a good idea to open your head up that much, especially when you have a shin check in the curriculum.

The General Defense (Blue Belt): The “General Defense” is a technique used to cover the head and the ribs on one side of the body. It works by performing an inside block with the opposite hand and a stiff arm block with the arm closest to the attacking limb. It works okay, but when it’s performed incorrectly, the defender can get quite hurt. If the close side arm is turned in too much, it exposes a straightened elbow to a lot of force, and it could dislocate under that force.


So how do these positives and negatives look all together? Not great, but not terrible either. Krav has some solid defenses within its arsenal, but we have to remember which ones are taught earliest and most focused on. The 360 Defense is simple in concept, but it’s also very easy to do wrong. It’s also treated as a kind of catch-all defense for punches, kicks, knives, and sticks. There are other defenses for each of these attacks, but the 360 is treated as the core of the system. 

I find that there’s a lot of hard blocking in Krav Maga and students are often taught to block at the point of most impact. This seems counterintuitive to me, if you’re trying to make a simple and effective art that anyone can learn. You can’t eat a kick from someone bigger than you. If you’re in a self defense situation, they could be bigger and stronger than you. I think that for a member of the IDF (who may carry a rifle, sidearm, and knife) this is a fine system. But for civilian self defense, I don’t agree with it.

So Krav has some solid defenses in it. The cover is great and head movement should always be a part of an art. But once again, these are cursory tools in how they are trained. There seems to be a lot more focus on outside defenses that keep you in range for more punches. They do have simultaneous attack and defense. But it seems that in trying to maintain simplicity, they have collected a number of underdeveloped tools. So overall, I’m going to give this a D+ grade, at most a C.

Fist Conditioning: the Good, the Bad, and the Arthritic

In the wide world of martial arts, strikers often have differing views on how to toughen the hands and build their body to handle the impact of striking with a closed fist. Some of these methods are tried and true, while others will leave you with hands that can’t hold a spoon. After years of training in many arts and working to keep my hands safe, I have decided to make this list of methods to try and methods to stay far away from. Understand that I am not a doctor or a physical therapist. I am not a master of Iron Fist. I am someone who has practiced striking arts for many years. This are my personal views on the subject of hand conditioning. Talk to a medical professional before taking up any hand conditioning.

Works Best

Hitting the Heavy Bag

The body conditions best for an activity by performing that activity. So if you want to be good at swimming, swim. If you want to be good at striking, strike. There are of course secondary and tertiary exercises you can do to improve this. Yet the best thing to get your hand conditioned to striking is to hit with them. The heavy bag is perfect for this. It’s a soft surface that still has weight. This means you don’t risk cracking bone, but if your form is off on a punch, you will feel it in your wrist. You get live feedback and returning pressure. Hitting the bag (even gloved) causes microfractures to occur in the knuckles, mostly the ends of the metacarpals. Any striker worth their salt hits the heavy bag.

To hit the heavy bag for conditioning, start with gloves on. Get used to hitting the heavy bag at varying levels of power. Practice your speed, cadence, and footwork. Once you are thoroughly used to hitting the bag with gloves, just wear some hand wraps. Do the same exercises you have been practicing. After a while, try without your wraps, completely bare knuckle.

Do not hit as hard as you have been, especially not as hard as you can. Instead, work on form and speed. Seek to find what works well for you. When learning to hit the heavy bag bareknuckle, do so under professional supervision. One should also understand that even after learning how to hit the heavy bag bareknuckle, much of the bag time should be spent gloved. Heavy bag conditioning is a slow, methodical process. Be careful and practice good form.

Knuckle Pushups

Knuckle pushups are beautiful things. They don’t really condition by impact, they condition the supportive structures of the hands and arms. Pushups work the triceps, pecs, delts, serrati anterior, and your abs. Knuckle pushups do the same, but also work the muscles and tendons of the forearms to keep your wrists straight. This helps prepare you for hitting with a closed fist and is an essential tool in any striker’s workout plans.

Pullups

I know it seems counterintuitive, but pullups can help your punches. While pullups mostly work the antagonizing muscles of a punch, they also improve your forearms and overall grip strength. When punching with a closed fist, you want the punch to be loose at first and lock into a strong grip on impact. I would also like to say, if you’re not doing pullups, go do some. Pullups are so useful as an everyday exercise. I would dare say they are essential. If you don’t have the space for a pullup bar, you can always do table rows. These will help with grip strength and work your upper back. If you like outdoor sports, try rock climbing as well.

Works Well

Weight Lifting

Weight lifting conditions your hands the same way it conditions the rest of your body. You put strain on your muscles and tendons and because of this, they heal stronger. Proper weight lifting will greatly improve your grip strength. Plus, lifting can be a very useful part of any growth or fitness plan. The reason I put this in “works well” instead of “works best” is because of the equipment needed and the knowledge needed. I would recommend going through a strength training program with a certified trainer if you are new to weight lifting. You can often find such programs at your local gyms and YMCAs.

Hitting Sandbags

Sandbags serve the same purpose as a heavy bag. Some can hang on walls, some are single bags used for iron fist training. Most bags nowadays come empty so you can fill with what you’d like. The old progression often looks like sand, dry beans, pebbles, steel shot. All you really need is the sand or dry beans. Sandbags condition your hand the same ways a heavy bag does, through impact. If you have wall bags, you can practice punches, chops, palm strikes and even finger jabs (carefully). Unhung bags are more often used to practice the full range of open hand striking. Since wallbags and lone sandbags are backed up by something hard like a wall or table, you don’t strike as hard as you would on a heavy bag. Slow, methodical strikes are how should start training with sand bags. If you aren’t used to these, I would recommend finding a coach or sifu who can give you advice on use.

Makiwara

Makiwara are striking posts used in karate, kenpo, and other such arts. The most common type is a single post of wood with a rectangular target at the top for striking. It can be made of rice straw, leather, rope, or sometimes duct tape and newspaper. Occasionally, you will also see makiwara with stone parts, but this is rare. Makiwara are an excellent resource for hand conditioning and striking training in general. I hesitate to put them in the “works best” category because they hold certain risks.  

The problem with makiwara is that one has a higher chance of damaging the knuckles or wrist. The point of makiwara is teaching the anatomy of a strike in karate. So you need to know how the makiwara will respond. This is why if you want to try makiwara, you should do so first under the supervision of a professional instructor. And I don’t mean some McDojo where you can blow through the belts. I mean someone who understands traditional fighting and conditioning methods. 

Sand Striking and Rice Digging

This one has a bit of a bad rep, but it does work. Sand digging and rice digging are great ways to build up your forearms and hands. These are great ways to help rehab wrists as well. It’s not the most bang for your buck in terms of strength, but helps with flexibility and tendon support. Striking into a bucket of sand or rice is also effective and allows you to help condition for strikes like eye jabs and panther fists. It can be a bit messy, so be sure to have a deep bucket and only fill it about halfway up.

Dangerous

Striking Steel and Stone

While there are traditional martial arts that engage in this, the risk is very high. Just because you see someone tapping their arms or shins on stone or steel, doesn’t mean you should strike it with your hand. I would also note that these practitioners only do so after years of conditioning on (relatively) softer materials. Even then most of the stone conditioning tools are show pieces and rarely see use. Don’t go around trying to punch rocks or smash your arms against concrete pillars. You will damage yourself. You will damage yourself more than is needed to build microfractures. You will regret it.

Iron Hand Training

Iron hand training is a large term that encompasses a variety of techniques. Essentially, the goal of such training methods is to toughen the skin and bones to withstand great forces and become better tools for destroying your opponent. The big issue with iron hand training is how varied the methods are. Some are simple and effective like striking sandbags and carrying weighted jars. That’s just impact training and weightlifting. More archaic methods of iron hand involve striking hot sand, punching large rocks and cooking one’s hands in an herbal soup. These latter methods will damage your hands and are just plain stupid.

One of the useful things that comes from iron hand training is dit da jow, but there are so many recipes and only a few really do the job. Plus, if you don’t have the time and money to make your own, it’s definitely not worth it. Most pre-made jows on the market are little more than slightly herbal rubbing alcohol. If you want to help your hands after conditioning, you’re better off icing them for a little bit. You can also throw on some menthol ointment or tiger balm, if you don’t have any cuts. Mentholated ointment (like VapoRub and Namman Muay) is menthol and eucalyptus based. Tiger balm is made from the same major herbs found in good jow.

Striking Wood Full Force

I’m not talking about breaking boards here. Board breaking can be a useful way to learn follow through with a punch. I’m talking about striking wooden poles, trees, and floors. It’s not helpful and if you’re new to striking, you have a large risk of spraining your wrist or even fracturing a carpal. Just don’t.


I hope this helps clear up some misconceptions for you. If y’all have any questions about any of the training methods here, let me know. I will be happy to go into greater detail on them.

Here’s one more tip: look at the old fighters. See who practices what kind of conditioning and see which ones can still write their name or pick up a cup. The ones who can move well, talk to them about conditioning.

Train smart, train hard, and never stop fighting.

Keeping it Clean on the Mats

Even before the coronavirus pandemic, we martial artists have always had cleanliness as a rule. One of the many reasons for this is that we are constantly in close contact with each other. We spread sweat, blood, and spit.

We have to take personal cleanliness seriously. It’s not just viruses we worry about. Martial arts gyms can be a breeding ground for fungal infections and even parasites. Most gyms work hard to make sure this isn’t the case.

As students, we also have responsibilities to stay clean and healthy. Below are some ideas to help you do so:

  1. If You Work Labor, Don’t Wear the Same Shirt You Worked In
    A lot of you already know to just have a change of clothes. But sometimes, someone shows up with a shirt full of grease or pants that have mud caked in. In most gyms, this isn’t a problem, since that person will be expected to change into a gi or gym clothes. Some self defense schools allow students to wear street clothes so they understand how to fight in them. Don’t be the guy who smells like ass. Bring a change of clothes.
  2. Carry Some Cleansing Wipes in Your Gym Bag
    To some this may sound silly, to others it sounds standard. Just get some flushable wipes to hit yourself with before and maybe after class. There are even separate kinds made for facial care. Don’t flush them though. While some wipes labeled flushable are indeed so, others are not. It can be hard to tell which are degradable in a sewage environment. So it’s safer to just throw them in the bin, especially when you’re using them for a quick cleanup.
  3. Never Wear Outside Shoes on the Mat
    This might seem to be a “no doy” statement, but it does need to be said. If you wear shoes when training on mats and indoors, get some wrestling or boxing shoes. Only wear these shoes when you are training. I recommend high tops, but that’s just my preference. Otherwise, if you’re training at a dojo or kwoon where no shoes are used, you’re all good.
  4. Clean Your Gear Regularly
    Be sure to wipe down your sparring gear, training pads, and other tools that take consistent use and sweat. Make sure that your gloves can dry out. It’s not common, but occasionally, closed hand gloves like boxing gloves can grow fungus. This can be combated by wearing hand wraps and washing those. Occasionally, it is also good to wash the inside of your gloves with soap and warm water. I use a soft toothbrush to help with this. Be sure that the gloves get a chance to dry after this. Glove deodorizers can help as well, but mostly just add a nice scent.
  5. Clean Yourself Regularly
    Shower consistently. Wear deodorant. Clip your nails. If you have long hair, be sure to comb it and put it in a protective hairstyle. All of these things will help you and your partners stay healthy.
  6. Clean Your Space Regularly
    Oftentimes, in traditional martial arts spaces, this is standard. Students will help to clean the mats and equipment. In some gyms, this is less common. Don’t be surprised if an instructor has students clean the mats. That is a part of the culture. If that’s not a part of your gym’s culture, that’s okay. The employee(s) will have general cleaning duties anyway. 
  7. Talk to Your Instructor When You Have Caught Something
    This could be a cold, a fever, or something like ringworm. Either way, let them know. If you still want to come to class, they may ask that you sit and observe, instead of engaging. If you have something respiratory, it’s good form to wear a mask. This is fairly common in many other countries, but isn’t a routine behavior across the board. Personally, I would like to see more of it.

With all this being said, most of this boils down to the ever present common sense. If you’re not sure about something, talk to your instructor or a student you trust. Different arts and different gyms will have different cultures of cleanliness. You can handle it as it comes to you.

Pressure or Flow? The Greatest Argument That Needn’t Exist

Oftentimes in grappling circles there comes the great debate: Which is more important, pressure or flow? While many agree that the two are essential to the game, we all have a favorite. Since we’re a community of people who fight for fun, a lot of posturing ends up making it an either/or situation. So here I am, writing this article in an attempt to show the merits of both concepts.

Pressure

Pressure is making your opponent carry your weight, but it is more than that. Pressure can pull someone in as much as it crushes. Pressure is also the concept of taking territory and not letting them take it back. Here are some ways pressure benefits a fighter:

  • Use pressure from a dominant position to wear out your opponent and keep your cool.
  • Use pressure from a negative position to keep good structure and find an escape.
  • Pressure passes are godly.
  • Pressure creates the pin. 
  • Pressure keeps your opponent on the defense.

So where do we see this breakdown? The first issue is not all pressure is good pressure. Effective pressure is debilitating and precise. If your only goal is to lay your weight on them, you will get eaten alive by fighters your own size. This happens a lot to bigger guys in gyms. It’s a valid tactic against a smaller dude, but you have to learn the details of every ride and pin. You want to think about giving them only bad options. Make them want to give you the back; make them want to pull away so you can sweep. Proper pressure can help a smaller fighter control larger and stronger opponents. Check out a tiny woman practice her pin on a bricklayer here. On the other side, you can always watch Jordan Burroughs go over pins for wrestling. Regardless of the arena, pressure exists in three ways: weight, structure, and control. Next time you grapple, think about where you are applying pressure. Check your structure, make sure your weight is balanced, and see how well you can control.

Flow

In modern grappling, we can see our understanding of flow come from Brazilian jiu-jitsu. Flow in this sense refers to the smooth ease of movement found within good grappling. In this sense, it may also be called “floating” in some circles. It also refers to the practice of rolling with very little strength or pressure. The point of such exercises is to allow the grapplers to focus on their fundamentals and find themselves in new positions. It also helps:

  • Smaller fighters practice with larger ones, older and younger, etc.
  • You learn new entries into positions and techniques.
  • You better understand the dynamic nature of the fight.
  • You get to practice when recovering or simply tired.

Flow rolls are a good thing, but sometimes grapplers get caught by the siren call of making flow their whole game. Your opponents won’t allow that.

So how does flow become a bad thing? It doesn’t, but we make bad decisions. Sometimes, while working a drill, people try to be cooperative, but instead become a dead fish. It is the groundfighting equivalent of sticking an arm out there and letting the tori do a fifteen count combo.

There has to be some energy from each participant. Without it, the exercise becomes detrimental to your ground game. In my experience, the point of flow is responding to your opponent, instead of trying to force something. With flow drills, you have to give each other real energy and have a goal in mind. If you focus so much onto flowing from position to position, you don’t give yourself the chance to really lock them in. I think it’s fair to say, grappling is about control. It’s important to make sure you have true control of yourself and your position.

Pressure and Flow

It’s up to each of us to find our own balance between the two. Anyone who has competed can tell you once there’s glory or reputation on the line, we all use every tool at our disposal. So someone who doesn’t have broad shoulders and greater weight, flow might be a larger part of their arsenal. For someone with a more classical wrestler’s build, pressure is probably their preferred method. So don’t worry what works best for others, worry about what works best for you. The only way to do that is to keep an inquisitive mind and stay on the mats.

Here are some ways you can maintain a solid understanding of both:

  • Make sure your technique is rock solid during rolls, check your structure constantly.
  • Occasionally add strength back in.
    Technique + Strength = Win
  • Have light rolls and heavy rolls.
  • Wrestle with everyone you can find. At least everyone who isn’t a real asshole.
  • Destroy your ego. Don’t refuse to tap until you’re broken and don’t force a submission either. You’re not in the ring, you’re rolling with friends.
  • Always stress the basics. Your foundation is what keeps you formidable.